First off the challenge here was plucking an idea from a snapshot from my G10 on Christmas day and turning it into a feeling I could communicate. Fortunately the Canon G10 packs more than 14 mpxls into a snapshot allowing a bunch of information that leaves room to crop away as much as thirty percent of an image and still have sufficient material to allow traction in post processing. BTW…. I used an ISO of 400 to avoid introducing too much noise…. The downside of the G10's densely packed mpxls.
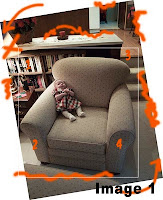
As you can see in the full frame capture in Image One… the lighting was contrasty tungsten which needed a bunch of adjustment in Adobe’s Camera Raw application. Fortunately I used a gray scale swatch in the first of this series to allow easy color balance.
 <- Click Here
IMAGE 1
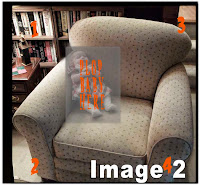
I used the auto rotate function of PS4 to rotate the image as shown by the arrows in the corners. Then I did a crop to get rid of the mass of confusion around the chair as I’ve shown with the orange squiggles. But even with tight crop, there was still a lot left to compete for the eye, when Katelynn Rose was clearly the subject. And the confusion was not just in a cacophony of shapes but also of palette and light. Sooooo…. I've suggested the final crop with the white outline in Image 1 and that's what you see below in Image 2.
 <- Click here
IMAGE 2
Now to get down to mood. With adjustment layers I saw that I had to not only create some mysterious drama but also burn away most heavily in areas 1 – 4. However, since I wanted to allow supporting visual interest in those four areas: How to do that yet not provide sufficient information to quarrel with the main story of the baby? Alien Skin’s Bokeh of course. After changing the over-all dynamic range with curves adjustment layers (six I believe carefully masking them in to different elements of the final image) I flattened the image, copied the layer… and applied Bokeh to it. Masked it away, then brushed back the creamy results into the four problem areas above and to a lesser extent to any of the chair’s fabric which continued to distract attention while introducing a dreamy sense consistent with the child's nap.
None of this is particularly challenging, but it’s all a matter of applying the right tool to the proper area to tease out the feeling I visualized when I took the photograph.
Does this transition from snapshot to moody image help anyone? Hope so….
Happy New Year….

2 comments:
I just made up a new word: "malliate" (v.), based on "malliable", which is "capable of being shaped or formed." :)
Happy New Year, Ted!
Oh my Ted - that seems like a lotta work! SURELY a lot of this could be done in PS CS4! In fact I could even do some of this in Nikon's Capture NX, but not all of it, as I can't use layers to paint in or out stuff. I really should see what NX2 is all about, lol.
But thanks for the explanation. It may help me in the future. :)
Flo
Post a Comment